Use Server Load Balancer To Realize High Availability
1. Experiment Overview
Server Load Balancer is a service that distributes traffic among multiple ECS instances. It can scale up the service capability of an application system by distributing traffic and enhance availability by eliminating SPOFs.
Alibaba Cloud provides two types of SLB instances:
- Classic Load Balancer (CLB): formerly known as SLB. CLB instances support TCP, UDP, HTTP, and HTTPS. CLB instances also provide powerful processing capabilities for Layer 4 load balancing and basic processing capabilities for Layer 7 load balancing.
- Application Load Balancer (ALB): ALB instances provide ultra-high performance to process network traffic at Layer 7. For example, you can use HTTPS offloading with ALB instances. Each ALB instance supports up to one million QPS. An ALB instance serves as a cloud-native gateway of Alibaba Cloud and also provides advanced routing features. ALB instances can forward, redirect, and rewrite messages based on user-defined HTTP headers, cookies, and query strings.
This experiment mainly uses the CLB instance.
1.1 Key points
This experiment covers the following key points:
- Structure and principles of Classic Load Balancer
- Start the Apache server on an ECS instance
- Configure a Classic Load Balancer instance
- Delete a Classic Load Balancer instance
1.2 Procedure
The experiment consists of the following steps:
- Prepare two ECS instances and a Classic Load Balancer instance
- Deploy the Apache server on the two ECS instances respectively
- Configure two ECS instances for the Classic Load Balancer instance
- Test request forwarding
1.3 Cloud resources
- An Alibaba Cloud Classic Load Balancer instance
- Two Alibaba Cloud ECS instances: Ubuntu 16.04
- Apache server
1.4 Prerequisites
- The system has automatically assigned a username and password for logging on to the Alibaba Cloud console.
- The system automatically creates an ECS instance with a Ubuntu environment.
- The system automatically creates a bucket of the OSS container.
1.5 Hint
- If you encounter some differences between the real experimental environment and the captured pictures in the lab manual, it may be caused by cloud portal version difference, which does not have a great impact on your experimental experience. You can click comment to give feedback to us. We will update the document in time. Thank you for your cooperation.
1.6 Default ECS account
By default, the required ECS instances is created in the experiment environment. If you want to remotely log on to and manage ECS instances, use the following username and password:
Default username and password of the ECS instances:
Username: root
Password: nkYHG890..
2. Use Classic Load Balancer
What is Classic Load Balancer
Classic Load Balancer is a service supporting multiple ECS instances, and must be used together with ECS. In this document, two ECS instances are created to carry the traffic forwarded by the listeners of Classic Load Balancer.
Classic Load Balancer sets a virtual IP address to virtualize multiple ECS instances in the same region into an application pool featuring high performance and high availability. Based on the method specified by the application, Classic Load Balancer distributes network requests from clients to the ECS pool. > Classic Load Balancer is a service supporting multiple ECS instances, and must be used together with ECS.
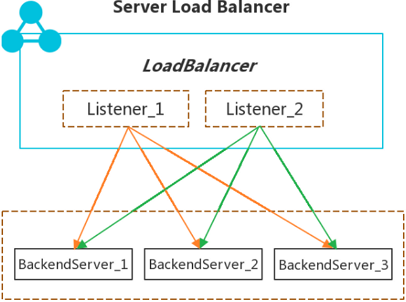
Components
Classic Load Balancer consists of a Classic Load Balancer instance, listeners, and backend servers. After the Classic Load Balancer instance receives requests from clients, the listeners distribute the requests to the backend ECS instances according to the configured listening rules, as shown in the following figure.
2.1 Start the experiment environment
Click Start Lab in the upper right corner of the page to start the experiment.
 .
.
After the experiment environment is successfully started, the system has deployed resources required by this experiment in the background, including the ECS instance, RDS instance, Classic Load Balancer instance, and OSS bucket. An account consisting of the username and password for logging on to the Web console of Alibaba Cloud is also provided.

After the experiment environment is started and related resources are properly deployed, the experiment starts a countdown. You have two hours to perform experimental operations. After the countdown ends, the experiment stops, and related resources are released. During the experiment, pay attention to the remaining time and arrange your time wisely. Next, use the username and password provided by the system to log on to the Web console of Alibaba Cloud and view related resources:

Go to the logon page of Alibaba Cloud console.

Fill in the sub-user account and click Next.

Fill in the sub-user password and click Log on.

After you successfully log on to the console, the following page is displayed.

2.2 View ECS instances
After the experiment environment is started, the system automatically creates three required instances, including two ECS instances and one Classic Load Balancer instance.
Use the username and password allocated by the system to log on to Alibaba Cloud console and go to the ECS management page and Classic Load Balancer management page.

View the ECS instance information. There are two running ECS instances.

ECS instance list:

Click “Manage” to go to the Instance Details page and view more information.

2.3 Start the Apache server
To balance the load, we must deploy the Apache server and provide Web services on the two ECS instances. The configuration procedures on the two ECS instances are the same. Therefore, the example shows the configuration of only one ECS instance.
2.3.1 View Elastic IP addresses of the ECS instances
Select an ECS instance to go to the management page and view the Elastic IP address of the instance.

If you are using a <font size=4>Windows</font> computer, please download the SSH tool putty�?

If your local environment does not have an ssh tool, you can use the default remote connectivity provided by ECS:


In this case, there is no VNC connection password. Click Cancel. Then reset the password:

Set new VNC connection password:

After setup, refresh this page and enter the new VNC connection password:

Connection is successful and login to the account:
Default username and password of the ECS instances:
Username: root
Password: nkYHG890..

If you are using <font size=4>Linux</font> or <font size=4>Mac OS</font>, you can open the client application on your local computer and run the following command to log on to the ECS instance with the default account:
ssh root@(Elastic IP address of the instance)
Default username and password of the ECS instances:
Username: root
Password: nkYHG890..
Use the Elastic IP address of the ECS instance to which you want to log on. When prompted to enter the password, the default will not display the input; only need to enter a complete password on it.

If you need to see the detailed login method, you can open the login link for further viewing.
After successfully logging on to the ECS instance, you can deploy the Apache server by installing the Apache software and start the service.
Run the following commands to start installation (notice the space between the commands):
apt-get update

apt-get install apache2 -y

After the installation is completed, run the following command to view the Apache running status. Press q to exit:
service apache2 status

The preceding figure shows that the Apache server is in running state.
Two ECS instances are used in the experiment and each is deployed with the Apache server. To know which ECS instance the traffic comes from, the static webpages of the Apache server on the two ECS instances must be differentiated.
Run the following command on one of the ECS instances (notice the space between the commands):
cd /var/www/html
echo 'Hello World, This is ECS-1' > index.html

The preceding commands are used to go to the root directory of the Apache website and write some lines to the index.html file. After running the two commands, open your browser and enter the IP address of the ECS instance you logged on to in the address bar.

As shown in the preceding figure, the modified content is displayed on the webpage. We can determine that the text displayed on the page is the data returned by ECS-1.
Then you need configure another ECS instance by following the same preceding steps, except for slightly changing the text for display as follows:
echo 'Hello World, This is ECS-2' > index.html
Access the IP address of the ECS-2 instance in your browser. The results shown in the following figure are displayed.

Now, the Apache server has been deployed on two ECS instances respectively, and Web services have been started. In the browser, you can enter the IP address of an ECS instance to access its webpage. Text returned by two Apache servers is different. Therefore, you can know on which ECS instance the Apache server you access is deployed.
2.4 View the Classic Load Balancer instance
The system has created a Classic Load Balancer instance by default. You can view the Classic Load Balancer instance in the console.

You will see the following new version of the console interface.

The IP address in the preceding figure is assigned to the CLB instance, which is also the IP address that you access. When you access the CLB instance, it intelligently dispatches the request to one of the backend servers to avoid overload of another server.
In this example, if you access the IP address, your request is forwarded to one of the two ECS instances. If one instance crashes, another instance can continue running to ensure you can access the address as usual. The whole process is transparent. Next, add backend servers, namely, ECS instances, for the Classic Load Balancer instance.
Click Add backend Servers. The two created ECS instances are displayed.

Refer to the figure below,Click Next.

Click Add.

Click OK.

You can see that the addition was successful.

title: Whether the SLB adds an ECS backend server
name: v1_31
2.6 Add a listener
Refer to the figure below,Click Listener.

Click Next.


Click Submit.

Click OK.

title: Whether the SLB adds a listener
name: v2_31
2.7 Run test
After the preceding steps, a Classic Load Balancer instance has been created, and two ECS instances are added to the backend server pool. All components run properly after correct configurations. Follow these steps to test the effect of Classic Load Balancer:
Find the public IP address of the Classic Load Balancer instance.

Open your browser and enter the public IP address of the Classic Load Balancer instance:

The responses are from the Apache server on the ECS-1 instance. Refresh this page. Responses from the Apache server on the ECS-2 instance are returned.

Different requests from the same page are scheduled to different backend servers by the Classic Load Balancer instance. In this way, the load is balanced. Due to load balancing with weighted round robin, both ECS instances have a weight of 100, so each visit is equally serviced by a different server.
2.8 Set different weights
Since both of the two ECS instances were previously set to a weight of 100, the request is evenly distributed across two instances, accessing the page twice: once by ECS-1 and once by ECS-2 return.
You can distribute requests by weight to two ECS instances by setting different weights.

Modify the weight of both to: 100, 50.
Refreshing the browser page reveals a symptom: every three refresh pages, there are two responses from ECS-1 and one from ECS-2.
<font color='red'>Users can cut off the above result picture when they are doing the experiment and send it to the teacher, indicating that the current experiment has been completed.</font>
To experience the effect of Classic Load Balancer more deeply, you can shut down one ECS instance. Then, the same response is returned if you access the IP address of this ECS instance multiple times.
title: Whether the SLB weight configuration is complete
name: v3_31
Reminder:
Before you leave this lab, remember to log out your Alibaba RAM account before you click the ‘stop�?button of your lab. Otherwise you’ll encounter some issue when opening a new lab session in the same browser:


3. Experiment Summary
In this experiment, we learned how to use Classic Load Balancer. To set up a Classic Load Balancer:
- first, create two ECS instances on the Alibaba Cloud platform and deploy the Apache server on the two instances respectively;
- modify the content of the homepage of each Apache server to differentiate the Apache servers of the two instances;
- create a Classic Load Balancer instance, add two ECS instances to the backend server pool, and set listener parameters to complete Classic Load Balancer configurations.
- Classic Load Balancer intelligently distributes requests to different ECS instances to balance the load.

