Automatically Build Java Projects With GitLab And Kubernetes
1. Experiment
1.1 Knowledge points
The following experiment primarily uses Alibaba Cloud Container Service and open-source GitLab.GitLab and Container Service for Kubernetes are automatically installed before the experiment. During the experiment, configure the mapping between GitLab Server and GitLab Runner, and create a Java project and submit it to GitLab. GitLab Server calls GitLab Runner to automatically build code and publish it to a Kubernetes container cluster.
1.2 Experiment process
- Configure GitLab
- Upload the Java project
- Verify the build
1.3 Scene architecture diagram

1.4 Cloud resources required
- ECS
- Container service
- Container Registry
1.5 Prerequisites
- You have a basic understanding of Elastic Compute Service (ECS) and Server Load Balancer (SLB).
- If you’re using your own Alibaba Cloud account instead of the account provided by this lab to operate the experiment, please note that you’ll need to choose the same Ubuntu 16.04 operating system for your ECS in order to run the experiment smoothly.
2. Start the experiment environment
Click Start Lab in the upper right corner of the page to start the experiment.
 .
.
After the experiment environment is successfully started, the system has deployed resources required by this experiment in the background, including the ECS instance, RDS instance, Server Load Balancer instance, and OSS bucket. An account consisting of the username and password for logging on to the Web console of Alibaba Cloud is also provided.

After the experiment environment is started and related resources are properly deployed, the experiment starts a countdown. You have two hours to perform experimental operations. After the countdown ends, the experiment stops, and related resources are released. During the experiment, pay attention to the remaining time and arrange your time wisely. Next, use the username and password provided by the system to log on to the Web console of Alibaba Cloud and view related resources:

Go to the logon page of Alibaba Cloud console.

Fill in the sub-user account and click Next.

Fill in the sub-user password and click Log on.

After you successfully log on to the console, the following page is displayed.

3.1 Log on to GitLab
Click Elastic Computer Service, as shown in the following picture.

Select US (Silicon Valley). Two automatically created Ubuntu ECS instances are displayed. If CentOS ECS instances automatically created by Container Service are also displayed, ignore them.One ECS instance is a 2-core 4 GB instance, and the other ECS instance is a 1-core 2 GB instance.Rename the 2-core 4 GB ECS instance “gitlab-server” and rename the 1-core 2 GB ECS instance “gitlab-runner”, as shown in the following figure.

The “gitlab-server” ECS instance has GitLab Server installed. The “gitlab-runner” ECS instance has GitLab Runner installed for running the pipeline tasks assigned by GitLab Server.
Copy the public IP address of the “gitlab-server” ECS instance and log on to the instance remotely.For more information about remote logon, see Logon.
The default account name and password of the ECS instance:
Account name: root
Password: nkYHG890..
After successful logon, run vim /opt/gitlab/embedded/service/gitlab-rails/config/gitlab.yml to open the “gitlab.yml” configuration file. In the file, replace the host address (shown in the following figure) with the public IP address of the “gitlab-server” ECS instance. Save the settings and exit.

Run vim /etc/gitlab/gitlab.rb to open the “gitlab.rb” configuration file. In the file, replace the IP address with the public IP address of the “gitlab-server” ECS instance.Save the settings and exit.

The original IP addresses in the two configuration files are the IP address of the ECS instance used to create an image. Therefore, they must be replaced here.
Run the following command to restart GitLab:
systemctl restart gitlab-runsvdir.service

Copy the public IP address of the “gitlab-server” ECS instance to the address bar of your web browser. When the GitLab logon page is displayed, enter the following username and password to log on to GitLab:
Username: root
Password: Aliyun-test123

After successful logon, an empty project without any files is displayed. It will be used in subsequent operations.

3.2 Register GitLab Runner
Obtain the URL and token of GitLab, as shown in the following figure.

Copy the public IP address of the “gitlab-runner” ECS instance and log on to the instance remotely.For more information about remote logon, see Logon.
The default account name and password of the ECS instance:
Account name: root
Password: nkYHG890..
Run the following command after successful logon:
l
Perform configuration as shown in the following figure. Replace the URL and token shown in the figure with your own.

Return to the web browser and refresh the page. The registered GitLab Runner is displayed.

3.3 Upload an SSH key
Back to the gitlab-runner command line, Run the following command to generate an SSH key:
ssh-keygen -t rsa

Run the following command to retrieve the created SSH key.The command output shows the complete SSH key.
cat ~/.ssh/id_rsa.pub

Go to the SSH key management page of GitLab, as shown in the following figure.

Copy the SSH key to the page and click Add key.

The SSH key has been added successfully.

3.4 Create a registry
Go to the Alibaba Cloud console, click Home in the upper left corner of the page, and select Container Registry.

The prompt shown in the following figure appears upon your first logon. Select US(Silicon Valley) in the upper left corner and click OK.


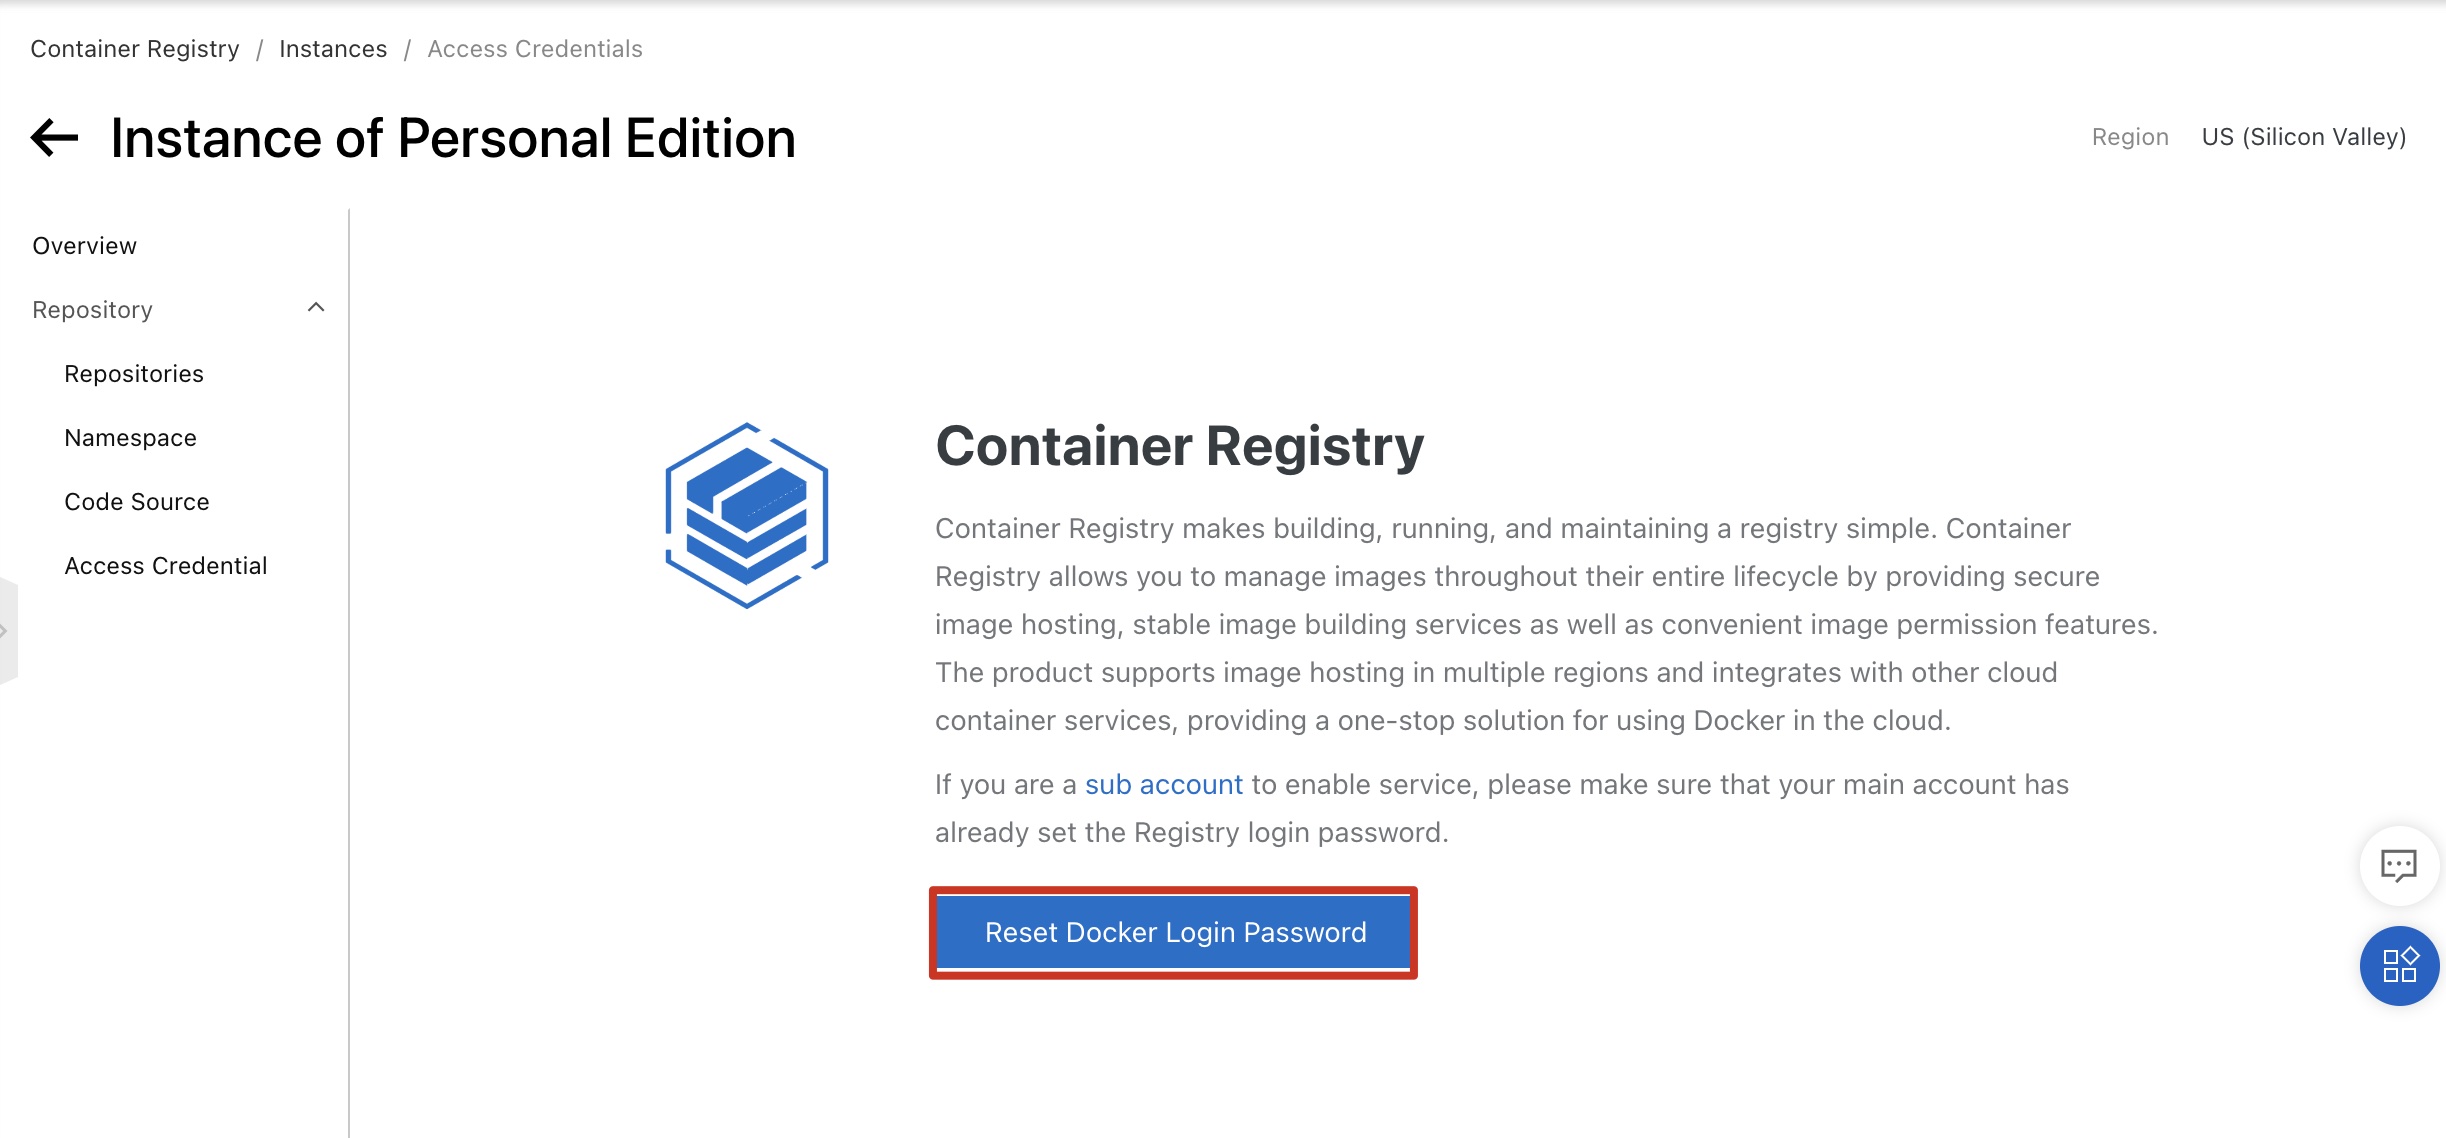
Set the Docker logon password to “Aliyun-test”.

Create a domain namespace, as shown in the following figure.Because the name of a domain namespace must be unique, we recommend that you name the domain namespace in the format “cicd-k8s-tutorial-“ + digits.

Create a repository, as shown in the following figure.Set Repository Name to “simple-rest-service” and click Next.

Repository Type select Public.
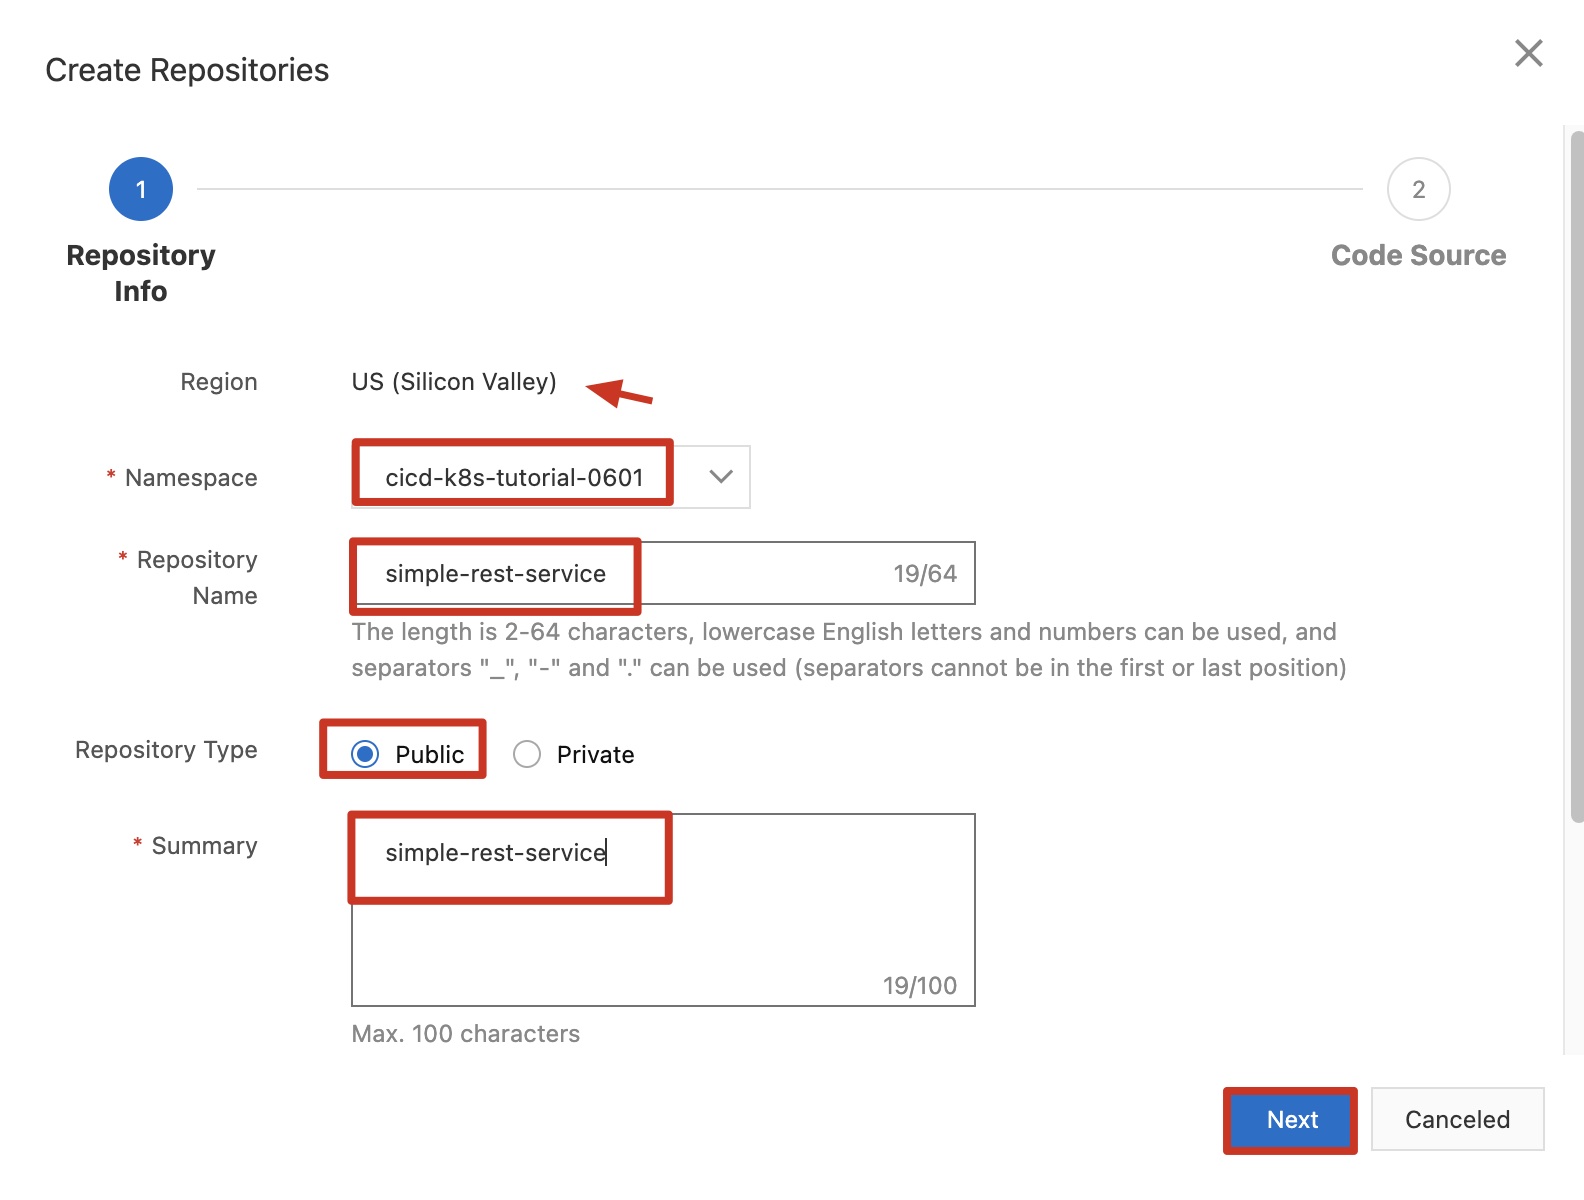
Click Create Repository, as shown in the following figure.

After the repository is created
The public IP address and username of the registry are displayed. Write them down for future reference.

3.5 Create Cluster
Refer to the following figure and select Container Service to enter the container service console.

Refer to the figure below to create a cluster first.

Select Delicated Kubernetes。

Refer to the figure below, set the cluster name, select the US (Silicon Valley) area, and check the VPC network and switch to which it belongs.

Set to obtain the public network access address of the cluster. Click Next.

Configure the Master node,
Refer to the figure below to set the master node instance type. Click Next.

Configure the Worker node.

Set the cluster access password and click Next.

The component configuration can default here, click Next.

Click Create Cluster。

It takes about 15 minutes to create a cluster. Please wait patiently.


3.6 Check the IP address of the Kubernetes container cluster
Click on the cluster name.

Click Manage. The IP address of the master node in the Kubernetes container cluster is displayed.Write down the IP address for future reference.

Click the GitLab icon in the upper-left corner, as shown in the following figure. On the GitLab homepage, click the “simple-rest-service” project.

Go to the CI/CD configuration page, as shown in the following figure.

Set the desired variables and click Save variables, as shown in the following figure.
DOCKER_REGISTRY_IMAGE_URL: Public IP address of the registry
DOCKER_REGISTRY_USERNAME: Username of the registry
DOCKER_REGISTRY_PASSWORD: Password of the registry
K8S_MASTER_PUBLIC_IP: Public IP address of the master node in the Kubernetes container cluster
K8S_PASSWORD: Password of the master node in the Kubernetes container cluster

4. Upload the Java project
Open the command-line interface (CLI) of the “gitlab-runner” ECS instance.
Run the following command to create a directory named “projects” and go to the directory:
mkdir ~/projects
cd ~/projects

Run the following command to download the “simple-rest-service” project from GitLab to the local host.Replace YOUR-GITLAB-SERVER-IP with the IP address of the “gitlab-server” ECS instance.
git clone git@YOUR-GITLAB-SERVER-IP:root/simple-rest-service.git

Run the following command to download the compressed project package:
wget http://labex-ali-data.oss-us-west-1.aliyuncs.com/gitlab-ci/ci-apps.zip

Run the following command to install the decompression tool:
apt update && apt -y install unzip zip

Run the following command to decompress the downloaded project package:
unzip ci-apps.zip -d ~/projects/simple-rest-service/

Run the following command to go to the “simple-rest-service” directory:
cd simple-rest-service

Run the following command to configure the username and email address of the local Git warehouse:
git add .
git config --global user.name "root"
git config --global user.email "labex@163.com"

Run the following command to submit the code:
git commit -m "Initial commit"

Run the following command to upload the Java project to GitLab:
git push origin master

5. Verify the build
Go to the project page of GitLab.

The code has already been uploaded, and a pipeline task is being built, wait about 7 minutes.

The pipeline task has been built successfully.

Log on to the master node in the Kubernetes container cluster remotely.Use the IP address obtained in Step 3.6
Account name: root
Password: Aliyun-test
Run the following commands after successful logon. Resource objects, such as deployment, pod, and service, have already been created automatically in the Kubernetes container cluster.The resource objects are created through the pipeline task that GitLab automatically runs after the code is submitted.
kubectl get deployments

kubectl get pods

kubectl get services

Users can also go to the container console to view the related created resource objects.


Reminder:
Before you leave this lab, remember to log out your Alibaba RAM account before you click the ‘stop’ button of your lab. Otherwise you’ll encounter some issue when opening a new lab session in the same browser:


6. Experiment summary
This experiment shows how to use GitLab to automatically build and publish a Java project.GitLab is an MIT-licensed Git warehouse management tool that enables access to public or private projects through the web interface. Similar to GitHub, GitLab provides functions for source code browsing, defect and comment management, and support for Concurrent DevOps software development. GitLab provides solutions throughout the DevOps lifecycle, from creating, verifying, and packaging to publishing, configuring, and monitoring. These greatly improve the software cycle efficiency and service upgrade speed.

